
Yükleniyor...
X

Lütfen Ülke (Bölge) Seçiniz

Türkiye (Türkçe)Türkiye (Türkçe) Worldwide (English)Worldwide (English)
X

Lütfen Para Birimi Seçiniz

Türk Lirası $ US Dollar
X
0
X
X
Oturum Aç
Hesap Oluştur

Hoşgeldiniz

Lütfen Giriş Yapın

Hesabınızda oturum açarak yönetmeye başlayın

Daha önce hesap oluşturmadıysanız kaydolun

.TR ALAN ADLARINDA BELGESİZ KAYIT DÖNEMİ BAŞLADI .com.tr, .net.tr ve .org.tr alan adlarını belgesiz kayıt edebilirsiniz! EKONOMİK HOSTİNGLERDE EKSTRA %5 İNDİRİM FIRSATI ! Web Sitenizle Daha Fazla Müşteriye Ulaşın, Ekonomik Hosting ile Başarın! x
X

Lütfen Ülke (Bölge) Seçiniz

Türkiye (Türkçe)Türkiye (Türkçe) Worldwide (English)Worldwide (English)
X

Lütfen Para Birimi Seçiniz

Türk Lirası $ US Dollar
Sn. Misafir Hoşgeldiniz, Giriş yap ya da kaydol.
X
0
X
X
Oturum Aç
Hesap Oluştur

Hoşgeldiniz

Lütfen Giriş Yapın

Hesabınızda oturum açarak yönetmeye başlayın

Daha önce hesap oluşturmadıysanız kaydolun

Bilgi Bankası

AnasayfaBilgi BankasıTestHow to Install Geeklog via Softacul...

How to Install Geeklog via Softaculous in cPanel

Softaculous helps you install web applications very easy. Please, follow the steps below to install Geeklog.


1. Log in to your cPanel account.


2. In the Software section, click on Softaculous Apps Installer.


3.
cPanel will redirect you to the Softaculous interface.


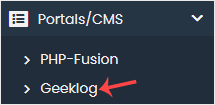
4. On the left side, locate the Portal/CMS category. Click on it and then on the Geeklog link that appears.


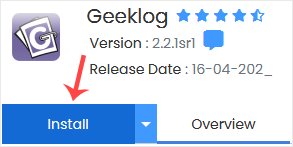
5. Click on Install.


6. Fill in the necessary fields under the Software Setup fields:
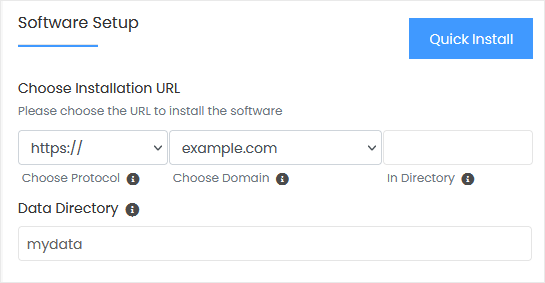
  • Choose Installation URL: Choose the appropriate protocol/domain. Inside the "In Directory" field, should you want to install this in a directory, i.e., example.com/directory, enter the directory name. Otherwise, please, leave it blank to install in your main domain, i.e., example.com.
  • Data Directory: Leave this as it is.


7. Under the Site Settings field, enter the following information:
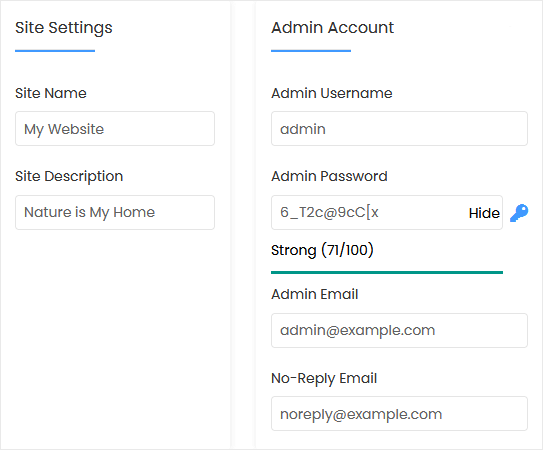
  • Site Name: Enter the name of your website, such as Geeklog.
  • Site Description: Your site description.


8. Under the Admin Account field, enter the following information:

  • Admin Username: Your new Geeklog username (for security reasons, do not use the administrator or the admin username).
  • Admin Password: Use a strong password.
  • Admin Email: Your e-mail address.
  • No-Reply Email: Your no-reply email address.

Note: Copy the admin username and password to Notepad. You will need those to access the admin area of your Geeklog website later.


9. Under the Choose Language field, enter the following information:
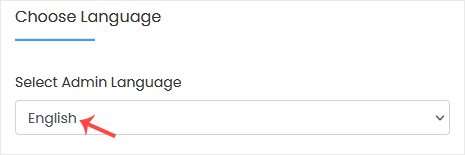
  • Select Admin Language: You can choose the admin language of your Geeklog. The default admin language of Geeklog is English.


10.
Advanced Options: Leave this unless you want to change the database name or take an automated backup. Please, note that creating frequent backups may take a lot of disk space.


Finally, scroll down to the end of the page and click on Install.

Aradığınız Bilgiyi Bulamıyor musunuz?

Bilgi bankasını detaylı olarak incelediniz, fakat ihtiyacınız olan bilgiyi bulamıyorsanız,

Bir Destek Talebi Oluşturun.
Faydalı Buldunuz mu?
(0 defa görüntülendi. / 0 kişi faydalı buldu.)

Çözüm Odaklı Destek

Copyright © 2025 Tüm Hakları Saklıdır.

Şimdi
Arayın

WhatsApp ile
İletişim Kur

20
Powered by WISECP
Top